HTML FOR BEGINNERS – INCLUDES TAGS FOR HTML5
Whether you’re interested in becoming a professional web developer or you simply want to learn more about how websites work, the first thing you need to study is HTML.
HTML is the standard language that is used for creating webpages and web applications. Every time you access a website, a server sends an HTML file to your computer and your browser interprets and displays the information included in that file. In fact, all the information you are reading now is simply data that has been stored in an HTML file and sent to your browser.
Here’s the best thing about HTML – it’s a simple language to learn.
Most people can learn the basics of HTML in just a few hours, and with a solid HTML foundation, you can progress to more complex languages such as CSS and JavaScript.
This guide will provide an introduction to writing HTML, examine the basic building blocks of HTML such as tags, elements and attributes, and help you create your first HTML page by following a step-by-step tutorial. By the end of this guide, you should have the basic knowledge required to start working on your own HTML projects.
If you are just looking to create a website and don’t want to bother learning HTML, I suggest you use WordPress. I have a few WordPress tutorials, including this one on starting a blog and this one on making a website.
What Is HTML?
HTML stands for HyperText Markup Language, which can be a confusing term for many beginners. The best way to explain HTML is to examine the meaning of each word.
HyperText refers to text that contains links to other texts. Every time you click on a highlighted or underlined link that takes you to another page, you are using hypertext. As more and more pages use hypertext to link to each other, a “web” of pages starts to form. This is where we get the term World Wide Web.
Markup refers to the special symbols or codes that are inserted into a document to tell the web browser how to display the document data. For example, markup code may tell the browser to display a phrase in bold or italic text, or may tell the browser which parts of the document are headings and which are paragraphs. HTML is just one of a number of languages that uses markup code.
Language refers to the idea that the code is standardized. Just like regular spoken languages, there are certain rules that everyone must follow when writing HTML. This is so that all browsers can understand and interpret the code. There are many different programming languages, and you may have heard of some of the popular ones such as Java, Python and Ruby. Each language has its own unique set of rules, and many languages can be used in combination with HTML to create amazing webpages and applications.
If we put these three definitions together, we could say that HTML is “a programming language that uses unique code which allows you to display linked documents in a browser”.
Why Should You Learn HTML?
These days, website builders such as Wix and SiteBuilder have made building websites easy. With a simple drag and drop interface and a variety of templates, anyone can build a website that is both functional and stylish.
But what if you’re not interested in having a website that looks just like everyone else’s? What happens when you want to make changes to your site that go beyond what’s available using the drag and drop builder?
With a basic knowledge of HTML (as well as a little CSS), you can build a truly unique website that you can edit and update yourself, and you won’t have to pay expensive monthly service fees.
Learning HTML is also considered the first step for progressing into more complex and in-demand programming languages. Fancy earning a six-figure salary as a web developer for a Silicon Valley startup? Or maybe you’ve got plans to develop the next Facebook or Twitter? If you’re interested in learning how to do any web related programming, HTML is the place to start.
Are There Different Versions Of HTML?
The first version of HTML was developed by physicist Tim Berners-Lee in 1990, and the first publicly available version was released in 1991. Since then, HTML has been updated numerous times to address advances in technology.
The current standardized version is HTML5, which has been in use since 2014.
Recommendations for change is HTML are made by the World Wide Web Consortium (W3C), a standards organization created with the purpose of developing guidelines and protocols for ensuring the long-term growth of the Web.
How Does HTML Relate To Other Programming Languages?
If you’ve done any research on web development and design, you’ve probably come across articles or guides that mention CSS and JavaScript.
HTML, CSS and JavaScript are the three main languages that are used to create most webpages. Each of the languages has a different function and each has different rules, but they all work together to give webpages content, design and functionality.
As we mentioned before, HTML is the foundation of any site. The HTML code contains the site’s basic structure and content, which includes all the text, links, tables, links to images and other such elements.
CSS (Cascading Style Sheets) is used to define the design of the page, including things like the size of each element and how it looks. With CSS, you can set things like the style of the font you are using, the background color of the page, and the width of the border around elements on the page.
JavaScript is a more complex language that is used to create interactive elements on your page. When you hover your mouse over an image on a website and the image morphs or changes, that’s JavaScript editing your original HTML code. When you click on a product on a shopping website and your shopping cart automatically updates, that’s JavaScript too.
CSS and JavaScript can add design and functionality to a site, but without HTML, you won’t have a site to begin with. In fact, most sites will still display HTML data even if the CSS and JavaScript code is broken.
Here’s what the Wikipedia HTML page looks like: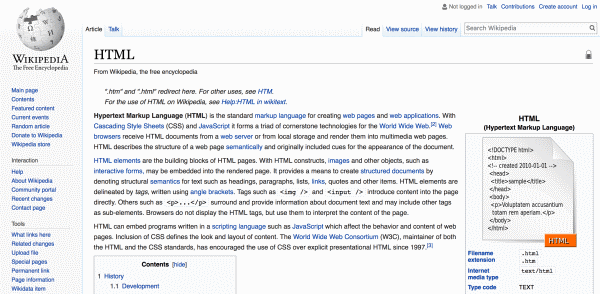
Now here’s what it looks like with CSS and JavaScript disabled: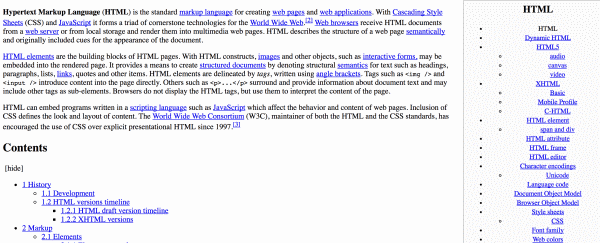
It doesn’t look pretty, but all the important content is still there.
What Does HTML Code Look Like?
Basically, HTML code looks just like regular text. The most identifiable feature of HTML code is the use of angle brackets. These angle brackets enclose the markup code which tells the browser how to display the document data.
Here’s an example of some simple HTML code:
<!DOCTYPE html>
<html>
<head>
<title>Page Title</title>
</head>
<body>
<h1>This is a heading.</h1>
<p>This is a paragraph.</p>
</body>
</html>
If you save this code into a text file with the filename “test.html” and open it in your browser, it should display a page like this:
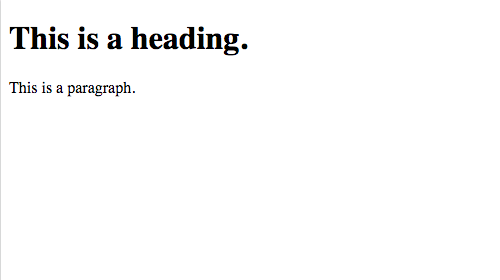
It’s not very exciting, but it’s a good example of a website in its simplest form. Even without any knowledge of HTML, you can probably understand a little bit about how HTML works by simply looking at the code above and comparing it to the image.
If you’d like to see what a more complex site looks like, try viewing the HTML source code of this page in your browser. The method for viewing source code differs depending on which web browser you’re using.
Microsoft Edge users can click the More icon and select Developer Tools from the drop down menu.
Microsoft Internet Explorer users can click on the View menu and select Source.
Mozilla Firefox users can click on Tools, Web Developer and then Page Source from the menu bar.
Google Chrome users can click on View, Developer and then View Source from the menu bar.
At the moment, the source code of this site probably looks like a foreign language (which is basically what it is), but by the end of this guide you should be able to examine the code again and have a good idea of what is going on.
What Programs Can I Use To Write And Edit HTML Code?
One of the best things about learning how to write HTML code is that you don’t need to buy any special software to get started. You can write and edit HTML code in any regular text editor.
Windows users can write code using the Notepad app which comes pre-installed with all versions of the operating system. Mac users can write code using the OSX equivalent which is call TextEdit.
However, if you’re planning to do a lot of coding, it’s probably a good idea to download and install a text editor that is specifically designed for coding. These apps have various features and add-ons that help you keep your code clean and readable, and will allow you to code more efficiently. Some popular features are highlighting different code elements, autocompletion of code, automatic syntax checking based on which programming language you are using, and multiple tabs for easy switching between documents.
Here are three popular text editors that have a wide variety of functions and are available for different operating systems:
Sublime Text Editor is a lightweight yet powerful editor that has an excellent UI (User Interface) and is available on Linux, Windows and MacOS. It offers multi-line selection and editing, has support for most programming languages, and there are many plugins available that improve the app’s functionality. It has a free trial version, or a paid version for $80.
Atom is another powerful text editor that has an approachable design, making it easy to use for beginners. It was developed by GitHub users, which is the main reason it’s so highly customizable and hackable. The built-in package manager allows you to easily download and install extensions, and the app can be used on Linux, Windows and MacOS. Atom is free to download and use.
CodeLobster is a free IDE for HTML, as well as PHP, CSS, and JavaScript. If you plan to learn and work with other coding languages, it’s a good idea to use an IDE that supports these. CodeLobster can be used on Windows and is free to download and use.
There are also a number of online code editors that allow you to write and test your code using just your browser. Some of these editors allow you to save and publish your code so you can share it with other people. Three popular online editors are JSFiddle, Codepen and Thimble.
The Basics Of HTML Code
There are three components that form the basic building blocks of HTML code: tags, elements and attributes. Once you’ve learned the rules for how each of these components function, you should have no trouble writing and editing HTML.
HTML Tags
You might remember we mentioned that the most notable feature of HTML code was the use of angle brackets. These angle brackets (and the code inside them) are called tags.
Tags are used to separate HTML code from regular text.
Any text written inside the angle brackets will not be displayed in the browser. The text inside the angle brackets is just used to tell the browser how to display or transform regular text located between the opening tag (also called the start tag) and the closing tag (also called the end tag).
Tags usually come in pairs, and the difference between an opening tag and a closing tag is that the first symbol inside the brackets of a closing tag is a slash “/“ symbol.
For example, here’s a pair of h1 tags (used to identify heading text), with some content in-between:
<h1>This is some content.</h1>
In this example, the <h1> is the opening tag and the </h1> is the closing tag.
How To Use Tags
Here’s an example of how we can use tags to transform text.
If we add the sentence “This is some text.” to our HTML file, it will simply display as regular text like this:
This is some text.
But if we want to have the sentence display in bold text, we can add a <b> opening tag before the text, and a </b> closing tag after the text. The “b” in the tag stands for “bold”.
If we add <b>This is some text.</b> to our HTML file, it will display like this:
This is some text.
If we want to have the sentence display in italic text, we can add an <i> opening tag before the text, and an </i> closing tag after the text. As you’ve probably guessed, the “i” stands for “italic”.
If we add <i>This is some text.</i> to our HTML file, it will display like this:
This is some text.
If we want to have the sentence display as a hyperlink, we can add an <a href=“www.google.com”> opening tag before the text, and an </a> closing tag after the text. Can you guess what the “a” stands for? This one’s a little harder… it stands for “anchor”.
If we add <a href=“www.google.com”>This is some text.</a> to our HTML file, it will display like this:
If we click on this hyperlink, it will take us to a different webpage. If you take a look at the code, you can probably guess which page this text links to.
Let’s put these three examples in to a simple HTML document:
<!DOCTYPE html>
<html>
<head>
<title>Page Title</title>
</head>
<body>
<b>This is some text.</b>
<i>This is some text.</i>
<a href=”www.google.com”>This is some text.</a>
</body>
</html>
If you save this file and open it in a browser, it should look like this:
![]()
Two Important Rules For Using Tags
There are two main rules you need to follow when using tags.
- You must always use angle brackets for tags. Square brackets and round brackets are used for different purposes in other programming languages. If you try to use square or round brackets in HTML, the browser won’t understand your code.
- Tags almost always come in pairs. This means that (except for a few special examples) you must always close a tag after opening it. If you forget to add a closing tag, the element you are trying to transform won’t display properly. In the worst case scenario, forgetting to close a tag may cause your page to crash. Many text editors will automatically add a closing tag, but it’s a good idea to start getting into the habit of writing tags in pairs. The best way to do this is to write the opening tag first, the closing tag next, then add the content between the tags last.
HTML Elements
The next thing we’re going to learn about is HTML elements.
An element is an opening tag, a closing tag, and all the content that is included between the two tags.
Let’s take a look at our previous example of how to use bold tags:
<b>This is some text.</b>
In this example, <b> is the opening tag, </b> is the closing tag, and “This is some text.” is the content. When we put it all together, we have an element.
Elements are the like the puzzle pieces of HTML. You take a bunch of elements and fit them together to make a complete picture. In its most basic form, a webpage is simply an HTML document that is filled with complete HTML elements.
Sounds simple, doesn’t it?
In most cases, elements are simple. The tricky part comes when you start putting elements within elements.
Let’s take a look at the very first example we used:
<!DOCTYPE html>
<html>
<head>
<title>Page Title</title>
</head>
<body>
<h1>This is a heading.</h1>
<p>This is a paragraph.</p>
</body>
</html>
You can probably recognize the h1 and p elements. If you look carefully, you may notice that these two elements are actually nested within another element, the body element. The body element is a special element that contains all the main content of the document that we want displayed in the browser.
Above the body element is another element, the head element. This is where we add special information about the document that we don’t want displayed in the browser, such as the document title and the document style.
The body element and the head element are separate elements, but you may have noticed that these two elements are actually nested inside another element, the html element. The html element is the most basic element of all, and contains all the other elements included in the document.
So if we go back and look at the h1 element, we can see that it is actually an element (h1) within an element (body) within an element (html).
When you start writing very complex code, you might find yourself working with elements nested ten, twenty or even one-hundred levels deep!
Let’s try a quick quiz to see if you understand how elements work.
We’ll start with a basic HTML document that has no content:
<!DOCTYPE html>
<html>
<head>
<title>Page Title</title>
</head>
<body>
<p></p>
</body>
</html>
We want to add the sentence “This is a very difficult quiz.” between the two p tags (p stands for paragraph), but we want to style it like the following image.
![]()
How do we write the HTML code so that the words “difficult” and “quiz” are in italics, and the word “very” is both bold and in italics?
Answer:
We need to put an i tag around the words “very difficult quiz”, and a b tag inside the i element and around the word “very”.
<!DOCTYPE html>
<html>
<head>
<title>Page Title</title>
</head>
<body>
<p>This is a <i><b>very</b> difficult quiz</i>.</p>
</body>
</html>
In this example, we have a b element inside an i element inside a p element. It’s important that we remember to close both the i and b tags or else the code won’t work.
HTML Attributes
The final piece of HTML code we have to learn about is attributes.
Attributes are used to define additional information about an element. They are located inside the opening tag, and usually come in name/value pairs (name=“value”).
All HTML elements can have attributes, but for most elements, we only use them when we need to.
Attributes can be used to define things such as the height and width of an image, the style of an element (eg. color, size, font) and the language of the document.
You may have noticed that we’ve already used an attribute somewhere in this guide. Can you remember where?
It was back when we were looking at anchor tags and we created a hyperlink:
<a href=“www.google.com”>This is some text.</a>
The anchor tag is used to create a hyperlink, and the href attribute is to define the link address. Without the href attribute, you can still click on the link but nothing will happen.
There are three main guidelines for using attributes. We use the word “guidelines”, because these are not exactly rules. They are more like standards that almost everyone has chosen to follow.
- Although you can write attributes in upper case, it’s a good idea to write attributes in lower case only.
- Although it’s not strictly necessary, it’s a good idea to put quotation marks around the value to make it easier to identify.
- Although you can use single quotation marks (‘value’), it’s a good idea to put values in double quotation marks (“value”).
So, when we put together everything we know about tags, elements and attributes, we get a basic template of how an element should be written:
<tag attribute=“value”>Some content</tag>
A Step-By-Step Tutorial For Coding Your First HTML Document
Now that we’ve looked at the basics of HTML, it’s time to put this knowledge to use by creating an HTML document from scratch.
In this tutorial, we’ll go through all the steps required to turn a blank text document into a fully functional HTML document that can be viewed in a browser. We’ll look at how to add some of the most commonly used elements to a document, and we’ll try using some attributes for extra customization.
By the end of this tutorial, you’ll have your own “HTML Cheat Sheet” document. In the future, if you forget how to add an image to an HTML document or you’re confused about whether you should be using “ordered” or “unordered” lists, you can come back and check your HTML cheat sheet.
A Special Tip: You’re going to be tempted to just copy and paste code from this tutorial straight into your cheat sheet document.
Don’t do it!
The best way to learn the basics of programming is to repeat things over and over until they become second nature. If you practice writing out all your code now, before long you’ll be closing elements and using double quotations without having to think about it. This will make things much easier when you start learning more difficult programming languages.
Step 1 – Create A New Document In Your Text Editor
The first thing we’re going to do is open up our text editor and create a new document.
For this guide we’ll be using the Brackets text editor, but you can use any text editor you like.
Once you’ve created a new blank document, click “Save” and give the document a name. There are a number of naming conventions that you need to follow when creating an HTML document.
- HTML documents should be saved with the .html file extension.
- The default homepage of a website will usually be named “index.html”, as this is the default file that browsers look for when accessing a website.
- You should only use alphanumerics (a-z, 0-9), dashes (-), underscores (_) or tildes (~) in the page name.
- You should only use lower case letters as some servers are sensitive to case.
- Never use spaces in the file name of HTML documents.
- It’s a good idea to create a naming convention and stick to it when planning a complex site.
You can pick any name you like as long as it follows these rules. For this guide, we’re going to name our document “index.html”.
Step 2 – Create A Basic HTML Template
Next, we’re going to create a basic HTML template that you can use for any future HTML documents. We’re going to add four elements – DOCTYPE, html, head and body.
On the first line of the document, add this element:
<!DOCTYPE html>
This is a special declaration that helps the browser display the page correctly by telling it the type of code we’re writing (in this case it’s HTML5). It should appear once at the start of the document before any other elements. This is a special element that doesn’t require a closing tag.
Next, we’re going to add the HTML opening and closing tags. These tags tell the browser that everything between the two tags is the HTML code that the browser needs to interpret.
We’re going to be adding lots of code between these two tags, so we’ll write each tag on a separate line. Add these two lines to your code:
<html>
</html>
Next, we’re going to add the head opening and closing tags on separate lines inside the html element.
The head element contains meta information about the document that will not be displayed by the browser. We’re going to add things to the head element later, so we’ll put a blank line between the two head tags to make it easier to read. Go ahead and add <head>, a blank line and </head> to the html element. It should look like this:
<!DOCTYPE html>
<html>
<head>
</head>
</html>
The last thing we’re going to add to our template is the body element. The body element contains important information about the document that will be displayed by the browser. This is where we will write most of our code.
The body element requires an opening tag and a closing tag, and it should be written inside the html element, after the head element. Go ahead and add the two body tags, as well as a blank line in-between. It should look like this:
<!DOCTYPE html>
<html>
<head>
</head>
<body>
</body>
</html>
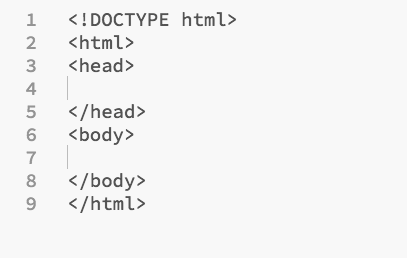
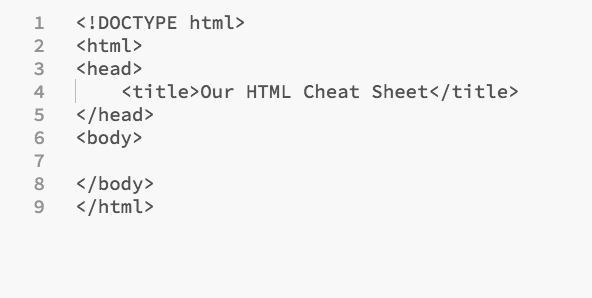
This template will form the foundation of our HTML document. In your text editor, it should look something like this (note: the numbers on the left side are included by some text editors to make your code easier to read – they are NOT part of the code):
Step 3 – Add A Page Title And Practice Some Indenting
The next thing we’re going to do is add a title to our page.
The page title is different from the file name. The page title is what is displayed in the browser tab, and it is also what is indexed when search engines (such as Google) crawl your site.
We write the page title inside the title element, which we add to the head element of our document. When we add the title element to the head, we’re going to indent it.
Indenting an element simply means moving it one step to the right. The reason we do this is to make our code easier to read.
Remember when we talked about nesting elements inside elements inside elements? If we keep adding elements directly underneath other elements, it becomes incredibly easy to lose track of where all our elements are located. Indenting adds some visual order to our code.
Indenting is one area of coding that many people argue about.
Should we indent using spaces or tabs (they are actually different things)?
Should we indent two, four or eight spaces?
Each coder has their own personal preference. For this guide, we’re going to indent with four spaces, but you can do whatever feels most natural for you.
One more quick point – although they are actually located inside the html element, we usually don’t indent the head or body elements as they are always the same for every HTML document.
Go ahead and add an opening title tag, the title of your page (it can be anything you like), and a closing title tag to the head element. Don’t forget to indent your element one step. When you’ve done that, the document should look like this:
Step 4 – Add Some Headings And Preview In The Browser
It’s time to start adding some content to the body of our HTML document. The first thing we’ll start adding are headings.
Headings are very important.
Headings define the structure of your document. Search engines use headings to index the structure and content of your page. If you don’t have your headings set up properly, it may be harder for people to find your page when they use a search engine.
People also use headings to skim through webpages, so having a good heading structure makes your page more reader friendly.
We can use the <h1> to <h6> tags to define our headings. <h1> the most important heading and <h6> is the least important heading.
You should never use heading tags to make your text bigger or bold. You can do that using other methods. Heading tags should only be used to define headings.
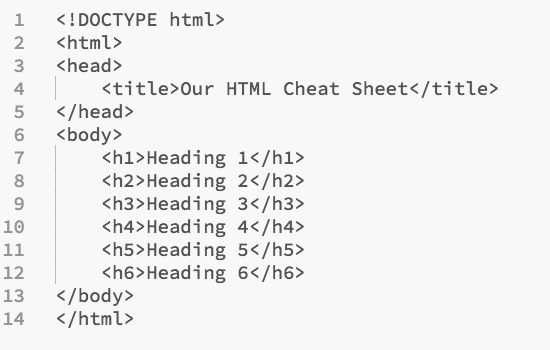
To see how headings work, let’s go ahead and add six headings to our document. The headings should be in the body element, and should be indented one step. You can put any text you’d like as the heading content. For this guide, we’ll just name them “Heading X”.
Add these lines to your body element:
<h1>Heading 1</h1>
<h2>Heading 2</h2>
<h3>Heading 3</h3>
<h4>Heading 4</h4>
<h5>Heading 5</h5>
<h6>Heading 6</h6>
Your document should look like this:
Now that we’ve got some content in our document, let’s see what the document looks like in our browser.
Save the HTML file in your text editor. If your text editor has a live preview, you can simply click on that button.
If your editor doesn’t have a live preview option, you’ll have to open it in your browser. The easiest way to do this is to open your browser, click on Open File in the File menu, navigate to the directory where you saved your document, choose your document and click Open.
When you open the document in the browser, it should look like this:
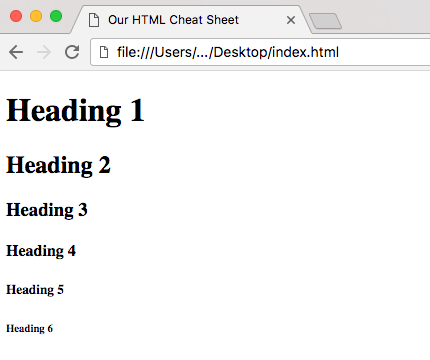
Notice how we have six different sized headings. We also have the page title showing in the browser tab.
From now on, anytime you make changes to the HTML document you should save the file and preview it in your browser, just to make sure that you haven’t made any errors.
Step 5 – Add Some Paragraph Text
The next thing we’ll do is add some paragraph elements. Paragraphs contain all our basic text content, and can be created using the <p> tag.
Adding text to a paragraph element is much the same as writing regular text except for one important difference: the browser will remove any extra spaces or lines when displaying the text.
For example, this code:
<p>
This is
a long paragraph.
It has
many lines
of HTML code.
</p>
Will actually display as:
This is a long paragraph. It has many lines of HTML code.
Another example is this code:
<p> This code has some extra spaces in some very strange places. </p>
Will actually display as:
This code has some extra spaces in some very strange places.
If we want to our code to display on a new line, we can use the <br> page break tag. Anytime we insert this tag into our paragraph code, the following text will start on a new line. The page break tag is always empty, so it doesn’t require a closing tag.
If we add some page break tags to the first example, we can make it display on separate lines.
This code:
<p>
This is<br>
a long paragraph.<br>
It has<br>
many lines<br>
of HTML code.
</p>
Should display like this:
This is
a long paragraph.
It has
many lines
of HTML code.
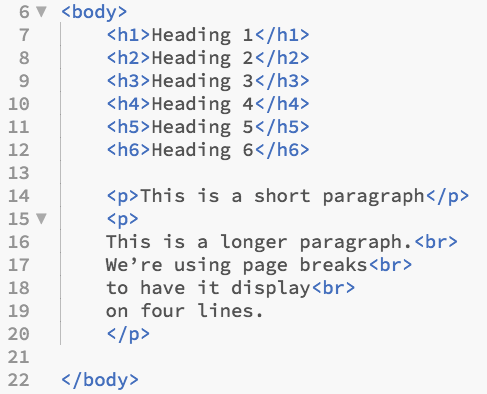
Let’s add two paragraphs to our HTML document. We’ll add them below the headings. The first paragraphs will be a simple short paragraph:
<p>This is a short paragraph</p>
The second paragraph will be a long paragraph that we’ll break up over a few lines:
<p>
This is a longer paragraph.<br>
We’re using page breaks<br>
to have it display<br>
on four lines.
</p>
Our code should look like this:
You can open the file in your browser to make sure it displays properly.
Step 6 – Add Some Formatting To The Text
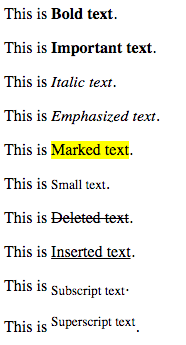
There are a number of different elements that let us add formatting to our text:
<b> – Bold text
<strong> – Important text
<i> – Italic text
<em> – Emphasized text
<mark> – Marked text
<small> – Small text
<del> – Deleted text
<ins> – Inserted text
<sub> – Subscript text
<sup> – Superscript text
Some of these elements have identical displays in the browser, but are actually used in different situations.
<b> and <strong> will have the same result – bold text – however <strong> is preferred when the text is semantically important.
<i> and <em> also have the same result – italic text – however <em> is preferred when the text is semantically important.
These two situations can be quite difficult for beginners to understand, and you shouldn’t really worry about them too much at the moment.
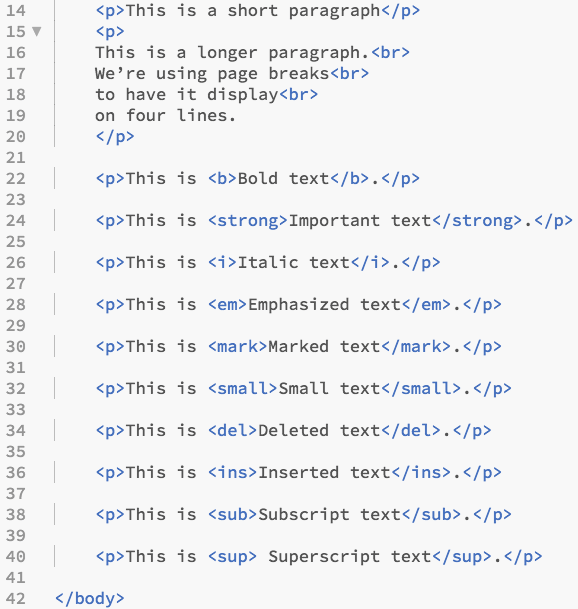
To see what each of these elements does, let’s add an example for each one to our HTML document. We’ll add the following code under our previous paragraph code, and we won’t format the whole sentence, just the relevant part.
Add this code to the HTML document (don’t forget to close each element!):
<p>This is <b>Bold text</b>.</p>
<p>This is <strong>Important text</strong>.</p>
<p>This is <i>Italic text</i>.</p>
<p>This is <em>Emphasized text</em>.</p>
<p>This is <mark>Marked text</mark>.</p>
<p>This is <small>Small text</small>.</p>
<p>This is <del>Deleted text</del>.</p>
<p>This is <ins>Inserted text</ins>.</p>
<p>This is <sub>Subscript text</sub>.</p>
<p>This is <sup> Superscript text</sup>.</p>
Our HTML document should look like this:
If you preview the document in a browser, the formatted text should look like this:
Step 7 – Add Some Style To The Text
To add style to our text, we can use the style attribute.
You may remember that we put attributes inside the opening tag of an element. We can add a style attribute to an element using this syntax:
<tagname style=“property:value;”>
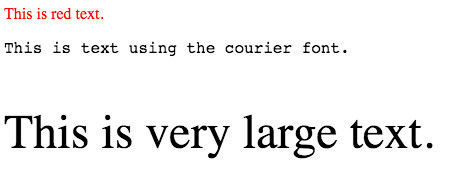
Some common properties we can use for style are color for changing the text colors, font-family for changing the text fonts, and font-size for changing text sizes.
The property and value are actually CSS code, which is why there is a semi-colon after the value. CSS is usually the next coding language people learn after HTML, but we’ll take a little sneak peak at some of the things it can do.
Let’s add an example of each style property to our HTML document. Add the following code below the formatting example:
<p style=”color:red;”>This is red text.</p>
<p style=”font-family:courier;”>This is text using the courier font.</p>
<p style=”font-size:300%;”>This is very large text.</p>
Some text editors use different colors to distinguish CSS code from HTML code:

If you check the document in your browser, it should look like this:
Step 8 – Create Some Lists
The next thing we’re going to practice is adding lists to our HTML document. Lists can be useful for grouping together similar kinds of information to make them easy to read.
There are three types of lists – unordered lists, ordered lists and description lists.
Unordered lists use the <ul> tag. Unordered list items use the <li> tag. Each item in the list will be displayed with bullets. Here’s an example of an ordered list:
- First list item
- Second list item
- Third list item
Ordered lists use the <ol> tag. Just like unordered list items, ordered list items use the <li> tag. Each item in the list will be displayed with numbers (starting from one). Here’s an example of an ordered list:
- First list item
- Second list item
- Third list item
Description lists use the <dl> tag. Items in a description list come in pairs – each item has a term and a description. The term is defined with the <dt> tag and the description is defined with the <dd> tag. Here’s an example of a description list:
First Term
First Term Description
Second Term
Second Term Description
Third Term
Third Term Description
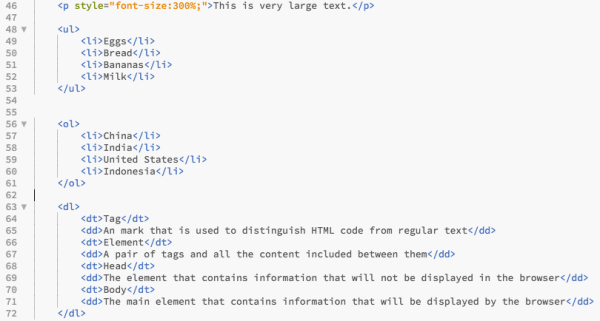
Let’s add one example of each kind of list to our HTML document under our previous example. It’s important to remember that both the list and each list item needs to be closed with a closing tag. You should also indent list items to make them more readable.
To make our lists more interesting, we’ll make the unordered list a shopping list, the ordered list a list of countries with the largest population, and the description list a list of some HTML terms and definitions.
Add this code to the HTML document:
<ul>
<li>Eggs</li>
<li>Bread</li>
<li>Bananas</li>
<li>Milk</li>
</ul>
<ol>
<li>China</li>
<li>India</li>
<li>United States</li>
<li>Indonesia</li>
</ol>
<dl>
<dt>Tag</dt>
<dd>An mark that is used to distinguish HTML code from regular text</dd>
<dt>Element</dt>
<dd>A pair of tags and all the content included between them</dd>
<dt>Head</dt>
<dd>The element that contains information that will not be displayed in the browser</dd>
<dt>Body</dt>
<dd>The main element that contains information that will be displayed by the browser</dd>
</dl>
Our HTML code should look like this:
If you check the HTML document in the browser, the lists should look like this:
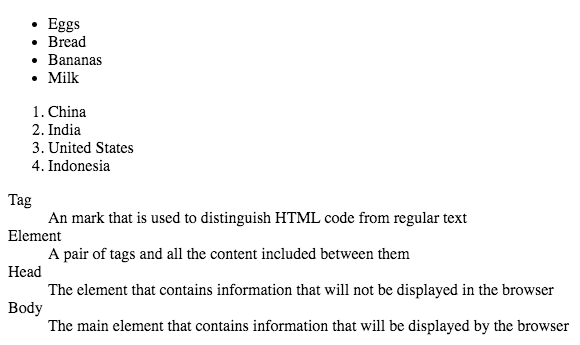
One final thing to remember about lists – lists can be nested. This means you can have lists within lists.
Step 9 – Create A Hyperlink
Remember when we talked about the World Wide Web being a network of linked pages? Without some links on our page it’s just a regular document, so let’s practice adding a hyperlink.
Hyperlinks are usually used to link to another internal or external page, but they can actually be used to link to any HTML element. For example, you can link to an image, a sound file, or even a PDF document.
We create a hyperlink using the anchor <a> tag. We specify the destination of the link by putting the href attribute inside the opening tag.
Here’s the basic syntax for a hyperlink:
<a href=“http://www.somewebsite.com”>The Text You Want To Link</a>
The href attribute (the thing you are linking to) doesn’t have to be an external web address. If you’re linking to a local file located on your server, you can simply add the filename and location.
You can also specify how the link opens by using a target attribute after the href attribute.
The target attribute can use these values:
- _blank – Opens the linked document in a new window or tab
- _self – Opens the linked document in the same window/tab as it was clicked (default)
- _parent – Opens the linked document in the parent frame
- _top – Opens the linked document in the full body of the window
- framename – Opens the linked document in a named frame
For example, this hyperlink will open the Google homepage in a new window:
<a href=”http://www.google.com/” target=“_blank”>Google Homepage</a>
Let’s add a hyperlink to our HTML document. We’ll link to the Mozilla Developer Network (MDN) list of all HTML elements.
Add this code below our previous example:
<a href=”https://developer.mozilla.org/en-US/docs/Web/HTML/Element”>MDN List of HTML Elements</a>
Once you’ve added the code, open the HTML document in your browser. Underneath the final lsit entry, you should have a link that looks like this:

Click on the link and it should take you to the MDN Elements page.
Step 10 – Add An Image
Most people agree that webpages full of text are boring. The best websites have lots of images, so let’s add an image to our site.
We can add an image using the <img> tag.
The image element is one of the few elements that doesn’t require a closing tag. We include all the important information as attributes inside the <img> tag.
There are three main attributes we can use with images – the source attribute, the alternative text attribute and the style attribute.
The src source attribute is used to define the location of the image we want to display. The location could be the address of a file stored somewhere else on the web, or it could be the location of an image stored on your server. If you want to show an image that is in the same directory as your HTML file, you can simply enter the name of the image file. If the image is located in a different directory or on another server, you have to specify the full address or path of the file.
The alt alternative text attribute is used to define some text that will appear if there is a problem displaying your image. This is important because it allows blind and visually impaired people to get some information from your site, and it also helps with Search Engine Optimization (SEO).
The style attribute can be used to define the width and height of an image in pixels (px).
The basic syntax for an image is:
<img src=”url” alt=”some_text” style=”width:width;height:height;”>
Let’s add an image to our document. For this example, we’ll use an image that is stored locally on our computer. If you have your own image you’d like to use, put a copy of that image in the same directory as your HTML document.
If you don’t have an image you’d like to use, go to Google Images, search for any image (we’ll search for “cute dogs”), pick an image you like, and save it to the same directory as your HTML document.
For the src attribute we’ll use the filename of the image (the filename of our image is cutedog.jpg), for the alt description we’ll use “a cute dog”, and we’ll set the image size as 400 x 400 pixels.
Add this code to your HTML document (we added an extra line break <br> because we want the image to display on a new line – if you want to see what happens without the <br>, give it a try without the line break):
<br>
<img src=”cutedog.jpg” alt=”a cute dog” style=”width:400px;height:400px;”>
When you preview the document in your browser, you be able to see the image like this:

Step 11 – Create A Table
Tables in HTML are great for displaying tabular data, such as an address book or a list of product descriptions and prices. Although tables are good for keeping things organized, tables should only be used for displaying data, not for defining the layout of a page.
We can use HTML to define the structure and contents of a table. We usually use CSS to style the table (eg. adding borders, colors and text alignment), so for this example our table is going to look very simple.
Creating tables can be a little confusing at first. The best way to learn tables is to create an example.
We first create a table using the <table> tag.
We then need to create our table row by row using the <tr> table row tag for each row.
In the first row, we can use the <th> table heading tag to define the heading for each column.
In each following row, we use the <td> table data tag to define the data for each cell.
Each element should be indented to make our table code easy to read.
Let’s practice tables by creating a short address book.
First, add a table opening and closing tag to the HTML document:
<table>
</table>
We’re going to have four rows in our table – one heading row and three data rows – so let’s add four table row tags inside the table element (don’t forget to indent):
<table>
<tr>
</tr>
<tr>
</tr>
<tr>
</tr>
<tr>
</tr>
</table>
In the first row, we’re going to add three heading using table heading tags – First Name, Last Name and Address:
<table>
<tr>
<th>First Name</th>
<th>Last Name</th>
<th>Address</th>
</tr>
<tr>
</tr>
<tr>
</tr>
<tr>
</tr>
</table>
In each following row, we’re going to add the data for each entry:
<table>
<tr>
<th>First Name</th>
<th>Last Name</th>
<th>Address</th>
</tr>
<tr>
<td>Mary</td>
<td>Smith</td>
<td>123 Main Street</td>
</tr>
<tr>
<td>John</td>
<td>Green</td>
<td>463 Church Street</td>
</tr>
<tr>
<td>Sally</td>
<td>Jones</td>
<td>867 Park Avenue</td>
</tr>
</table>
When you’ve added all the information, our HTML document should look like this:
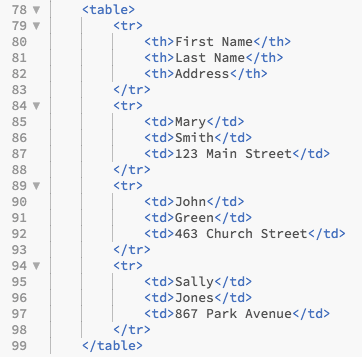
When you view the document in the browser, the table should look like this:

Step 12 – Add A Quotation
Quotations can be used to highlight an important quote contained within some text.
There are two types of quotations – regular quotations and block quotations.
Regular quotations use the <q> tag and simply add quotation marks around everything inside the element. At first, using this element may seem unnecessary as we can simply use regular quotation marks in the text. But the quotation element becomes important when we start styling our page with CSS. Using CSS, we can style all our quotes at once by selecting all the <q> tags and making them bold, italic, a different size or a different color.
Block quotations use the <blockquote> tag and create a stylish indented block of text.
Let’s add one of each type of quote to our document.
For the regular quotation, add this code to the document:
<p>This is an example of a regular quote – <q>to be or not to be.</q></p>
For the block quotation, let’s add a paragraph from the Lorem Ipsum. The Lorem Impsum is a piece of classical Latin text that is often used by web developers as a placeholder. When web developers are creating a website but don’t know what content will be used on the site, they often add text from the Lorem Ipsum.
Add this code to the document:
<p>This is an example of a block quotation – <blockquote>Lorem ipsum dolor sit amet, consectetur adipiscing elit, sed do eiusmod tempor incididunt ut labore et dolore magna aliqua. Ut enim ad minim veniam, quis nostrud exercitation ullamco laboris nisi ut aliquip ex ea commodo consequat. Duis aute irure dolor in reprehenderit in voluptate velit esse cillum dolore eu fugiat nulla pariatur.</blockquote><p>
When you add the code, our HTML document should look like this:

When you preview the document in the browser, the quotations should look like this:

Step 13 – Add A Comment
The final thing we’re going to learn about is comments.
Comments are a special kind of element that can be included in any part of the HTML document, but will not be displayed by the browser.
The syntax for comments is:
<!– Write your comments here –>
Comments have two main purposes.
The first purpose is to add notes to your code. These notes can be for yourself (eg. a note reminding you why you edited a certain section of code), or could be for other people (eg. a note to explain something to another person working on your site).
The second purpose is to debug your code. Debugging means searching for and fixing problems with your code. If you have a problem with your code and you think you’ve figured out what is causing the problem, it’s much easier to test your theory by commenting out the code instead of deleting it.
Let’s practice commenting by adding two comments to the end of our code.
The first will be used to comment out an error in our code.
Add this line to the HTML document:
<img src=”ahappycat.jpg” alt=”a happy cat”>
If you preview the document in the browser, you’ll notice that we have a big problem.
This is an image element, but it’s linking to a file that doesn’t exist!
We’ll keep this code as we may want to fix it later. But for the moment it’s causing problems, so we’ll comment it out.
Add a comment tag and a short note around the broken element:
<!– Do not display this broken image
<img src=”ahappycat.jpg” alt=”a happy cat”>
–>
If you preview the document now, you’ll notice that the broken element is no longer displayed.
The second comment we’ll add is a regular note.
We’ve reached the end of the tutorial, so let’s add a congratulatory message that won’t be displayed by the browser.
Add this code to the document:
<!– Congratulations. This is the end of the tutorial. —>
If you preview the document now, you’ll notice that this comment is not displayed in the browser.
Conclusion
After completing this tutorial, you should have a solid foundation for coding in HTML.
You should be able to open the source code of any page on the web and be able to identify certain HTML features and know how they affect what is displayed in the browser window. You should be able to identify images, tables, lists, comments and many other HTML elements.
The next step is to practice what you’ve learned by coding your own page from scratch. Anytime you get lost or confused, you can look back at this tutorial to find the answer.
Once you’re confident in your HTML skills, you can move on to the next step in your web development journey – styling your page with CSS.


No comments